# Install a package, which only needs done once per package
# Do not include install.packages() in your scripts
# Instead, run this function in the Console window
install.packages("tidyverse")3 Coding: First Steps
3.1 Packages
Resource: Grolemund appendix B
Packages are add-ons that add functionality to base R. Some packages are outstanding. Others are great. And some should be avoided.
We will start by using various packages from the Tidyverse collection. Run the following code to install the Tidyverse collection of packages.
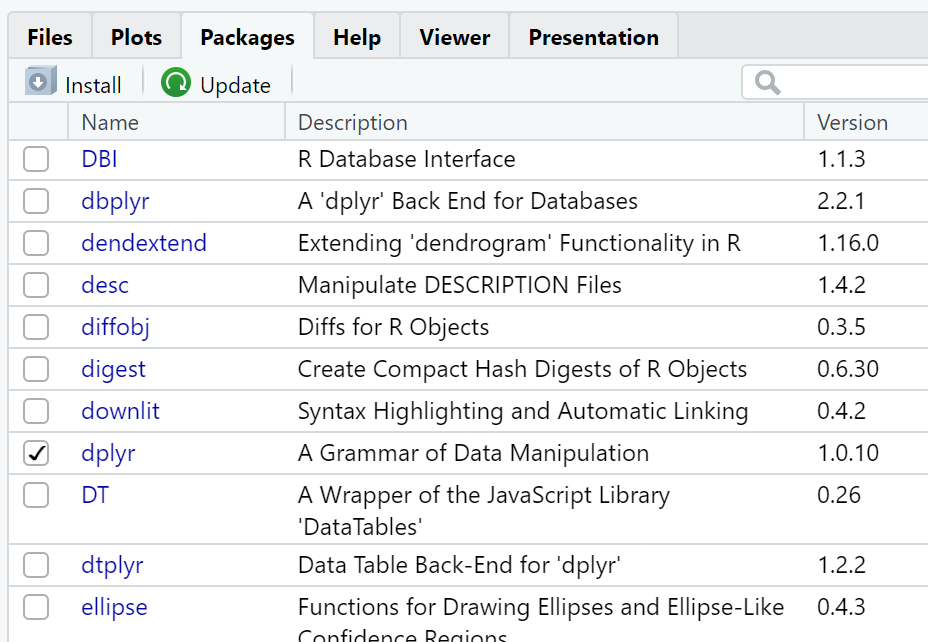
You need to load a package every time you re-launch R and need to use that package. Load the dplr package, which is part of the tidyverse, with the following code.
# Load a package
# Include library() statements at the top of your scripts
# for all libraries required to run your code
# Add a comment explaining why each package is needed
library(dplyr)              # for case_when() used in skill 10

# Sometimes you need to check the version of a package
packageVersion("dplyr")
You can use the Packages tab in the Plot window to verify a package is loaded. Avoid using the GUI interface (i.e. check box) method for loading packages. This GUI method may seem convenient but it will cause problems in the long run. Rather, ensure all packages are loaded at the top of your script with the library() function. This will ensure the correct libraries are loaded anytime you run your script.
3.2 Conditionals
Resource: Rodrigues chapter 7, section 7.1
We use conditionals to control flow within a program. Conditionals control flow by branching based on a CONDITION. Our primary conditional of interest at this time is the if-else statement.
- Syntax
-
Syntax are the rules associated with a grammar (i.e. How things are supposed to be written).
Here is the syntax of the if-else statement:
if (CONDITION) {
The code executed if the CONDITION is true
} else {
The code executed if the CONDITION is false
}
The code executed can be one or more lines of code. The CONDITION can take any of the following forms where A and B can be compound statements (i.e. include more than one object). Notice the double operators ==, ||, and &&. Do not use the single version of these operators in the if-else statement.
| Operator | Example Condition | Explanation |
|---|---|---|
| > | A < B | Is A less than B? |
| <= | A <= B | Is A less than or equal to B? |
| > | A > B | Is A greater than B? |
| >= | A >= B | Is A greater than or equal to B? |
| == | A == B | Is A equal to B? |
| != | A != B | Is A not equal to B? |
| ! | !A | Is the opposite of A true? (read, “Not A”) |
| || | A || B | Is either A or B true? (read, “A or B”) |
| && | A && B | Are both A and B true? (read, “A and B”) |
Notice the layout and spacing of the example code, which differs from Rodrigues chapter 7, section 7.1.1 and aligns with Wickham chapter 2, section 2.4.1. We will use Wickham’s approach for conditionals.
# Using the `if-else` statement to control program flow
# The print() function sends output to the Console window
current <- 84
passing <- 70

if (current >= passing) {
  print("I am passing the class.")
} else {
  print("I am NOT passing the class!")
}
There are an unlimited number of variations in ways to configure the if-else statement with the operators in Table 3.1 and objects that you create.
# Objects to hold grades for the example `if-else` statements
current <- 84
passing <- 70
goal <- 90
assignments_left <- 4

# No `else` portion of the `if-else` statement
if (current == passing) {
  print("I am just barely passing.")
}

# Compound `CONDITION`
if ((current > passing) && (current < goal)) {
  print ("I am passing, but ...")
  print ("I still need to improve my grade to reach my goal.")
}

# Embedded `if-else` statement
# These can get overly complicated and are sometimes useful
# Embedded `if-else` statements can often be improved with
# compound `CONDITION` and/or a different form of conditional
if (current > passing) {
  if (current < goal) {
    if (assignments_left < 10){
      print("Not enough assignments left to reach my goal.")
    } else {
      print("I may be able to reach my goal.")
    }
  } else {
    print("I have reached my goal!")
  }
} else {
  print("I am not passing this class.")
}

# Using `else if`
if (current < goal) {
  print("I have not reached my goal.")
} else if (current > goal) {
  print("I have exceeded my goal.")
} else {
  print("I have met my goal.")
}
The case_when() function from the dplr package offers a better conditional when working with multiple options. This function works by evaluating one statement at at time and stopping whenever it encounters a statement that evaluates to TRUE.
# Load all required packages
library(dplyr)   # for case_when()

# Objects to hold grades for the example `case_when()` function
current <- 84
passing <- 70
goal <- 90
assignments_left <- 4

case_when(current < passing ~ "I am not passing this class.",
          current < goal && assignments_left < 10 ~ "Not enough assignments left to reach my goal.",
          current < goal && assignments_left >= 10 ~ "I may be able to reach my goal.",
          current >= goal ~ "I have reached my goal!"
          )
3.3 Loops
Resource: Rodrigues chapter 7, section 7.1
We use loops to control flow within a program. Loops control flow by repeating a section of code based on a COUNT or CONDITION. Our primary loops of interest are the for and while loops.
Here is the syntax for the for loop:
for (COUNT) {
The code executed repeatedly up to the maximum of COUNT
}
As with the if-else statement, the code executed can be one or more lines of code. Unlike the if-else statement, the COUNT is always based on a count (i.e. one to three times or one to 14 times, or one to 100 times, etc.). Thus, the for loop executes once for each count (i.e. 1, 2, 3, 4, etc.) up to the maximum count. The COUNT can be tied to the value stored in an object. The for loop automatically increments COUNT
# Using the `for` loop to control flow
# `i` is the common name of the object used to hold count,
# but any proper object name will work
# `1:10` is a vector of 1 through 10
# `cat()` is the concatenate function
# `\n` forces a new line
for (i in 1:10) {
  cat("i ==", i, "\n")
}

# The `for` loop can count backwards
for (i in 5:1) {
  cat("i ==", i, "\n")
}

# The `for` loop is always based on a count
# The count can include a value from an object
target <- 7
for (i in 1:target) {
  cat("i ==", i, "\n")
}

# The `for` loop can contain other code and functions
for (i in 1:10) {
  if (i == 5) {
    cat("We made it to", i, "\n")
  } else {
    cat("i ==", i, "\n")
  }
}
Here is the syntax for the while loop:
while (CONDITION) {
The code executed repeatedly as long as the CONDITION is true
}
As with the if-else and for statements, the code executed can be one or more lines of code. Unlike the for statement, and similar to the if-else statement, the loop executes as long as the CONDITION is true. Thus, the while loop executes while the CONDITION is true. Valid operators include those in Table 3.1. The while loop does NOT automatically adjust any value in the CONDITION. Thus, you must ensure code within the while loop adjusts a value so the while loop can eventually end.
# Using the `while` loop to control flow
i <- 2 # Set the counter to the starting point
while (i < 65) {
cat("i ==", i, "\n")
i <- i + i # Increment the counter, which will ensure the `while` loop will exit
}
# The `while` loop can count backwards
i <- 10
while (i > 0) {
cat("i ==", i, "\n")
i <- i - 2
}
# The `while` loop is always based on a condition
# Sometimes the condition is based on a count
# Sometimes the condition is not based on a count
# The `sample()` function generates a random number,
# in this case the random number is an integer from 1 to 6
i <- 1
while (i != 4) {
cat("i ==", i, "\n")
i <- sample(1:6, 1) # Like rolling a dice
}
# The `while` loop can contain other code and functions
# The `%%` is the mod operator (short for modulo),
# which returns the remainder after division
i <- 1
while (i < 10) {
if (i %% 2 == 0) {
cat("i is even and i ==", i, "\n")
} else {
cat("i is odd and i ==", i, "\n")
}
i <- i + 1
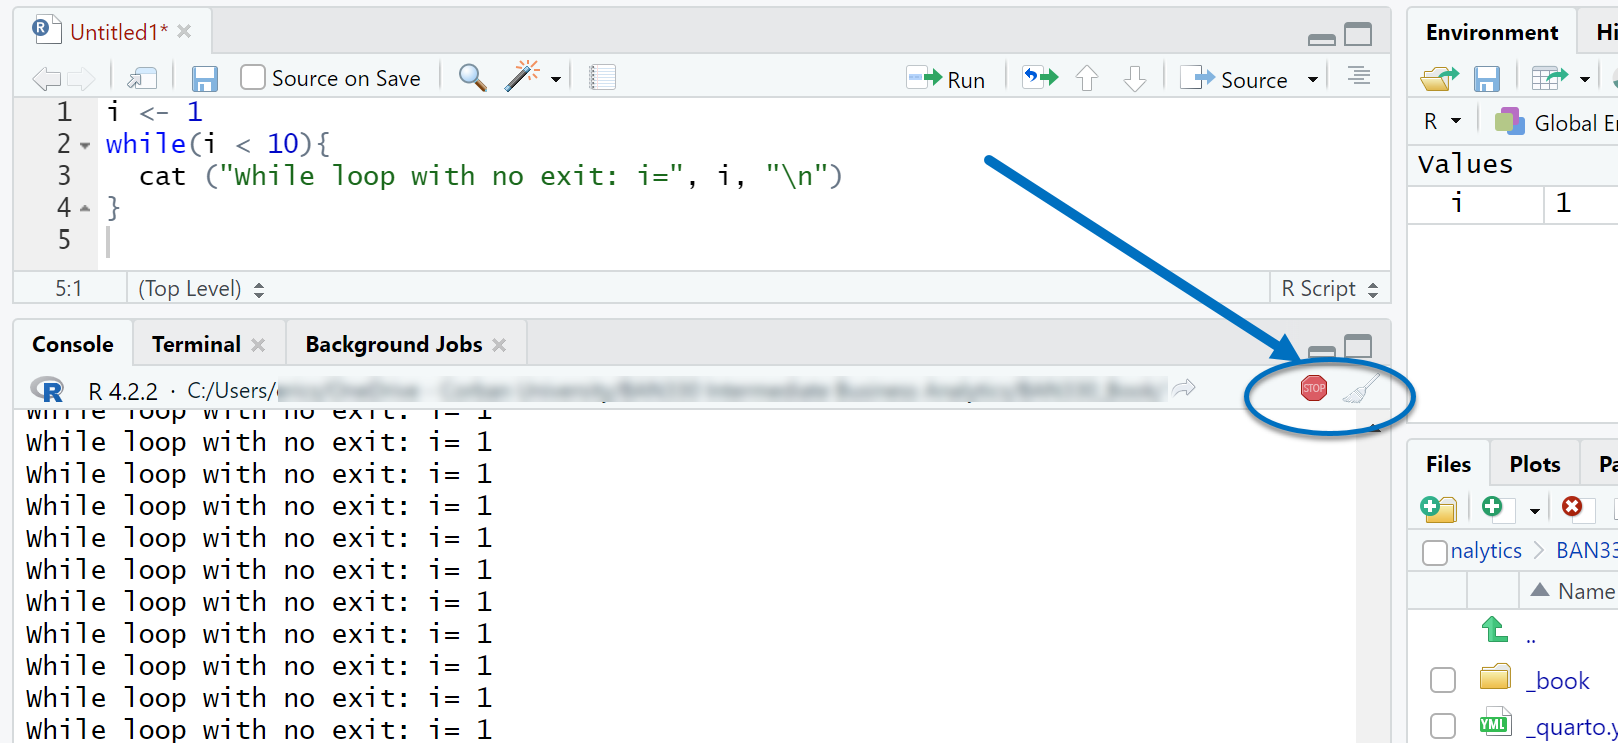
}Your program will enter a continuous loop if you fail to provide an exit strategy (i.e. failing to increment your counter or failing to write the condition correctly). You can use the stop icon on the Console window to stop a program that is running for too long.
3.4 Pipes
Resource: Wickham & Grolemund (2nd. ed.) chapter 5; Wickham section 4
- Pipes
-
A pipe is an assembly line where the left-hand thing (i.e. object or output of a function) is fed into the right-hand function.
Pipes help us avoid nesting functions and avoid creating multiple interim objects. Piped functions are easier to read than nested functions and more concise than using interim objects. Both of these improvements help with writing code for people. We will use the base R pipe operator |>.
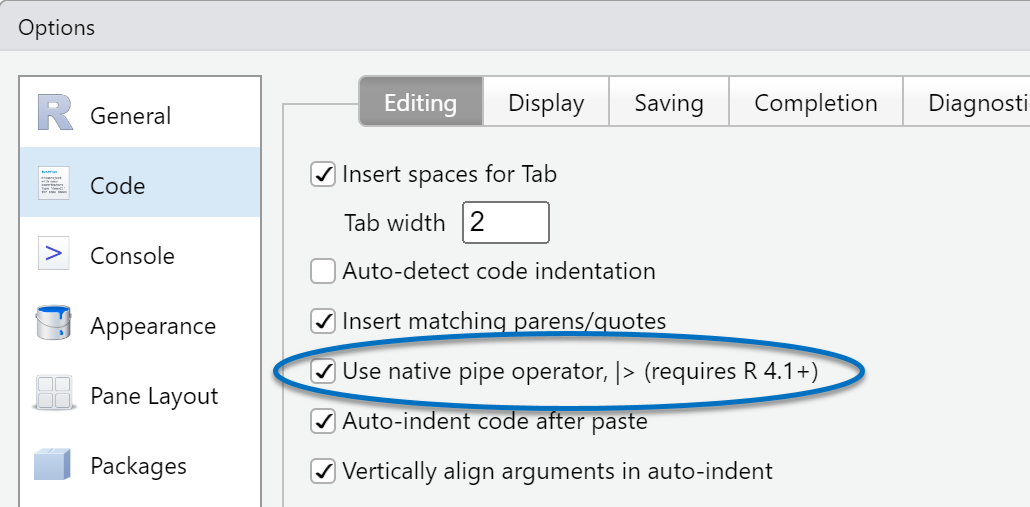
Set your RStudio CTRL + SHIFT + M shortcut to insert the base R pipe operator |> by selecting Tools > Global Options > Code and then check the “Use native pipe operator” box as shown in Figure 3.3
# Nested function example from Section 2.1.5
format(Sys.time(), "%A %b %d, %Y at %R")

# The same result using pipes
# Read the Pipe operator as "then"
# Sys.time then format
Sys.time() |>
  format("%A %b %d, %Y at %R")

# We can store the results of the piped functions into an object
my_time <- Sys.time() |>
  format("%A %b %d, %Y at %R")

# Pipes are most beneficial when using 3 - 8 functions
# Read this pipe as measurement 1 then absolute value then
# square root then round to 3 decimal places
measurement_1 <- -10.4
answer_1 <- measurement_1 |>
  abs() |>                     # Absolute value
  sqrt() |>                    # Square root
  round(3)                     # Round to 3 decimal places

# Here is the nested version of the above piped code
# Which do you think is easier to read?
answer_2 <- round(sqrt(abs(measurement_1)), 3)
3.5 Regex
Resource: Wickham & Grolemund (1st. ed.) chapter 14
- regex
-
Regex is shorthand for regular expression, which is a pattern for searching a character vector (aka string or text or word or sentence)
The search pattern in a regex can include any of the following special codes.
| Symbol | Keyboard | Translation in a regex |
|---|---|---|
| . | Period | Match any single character except newline \n |
| * | Shift-8 | Match zero or more occurrences of the previous pattern |
| + | Plus | Match one or more occurrences of the previous pattern |
| ? | Question Mark | Match zero or one occurrence of the previous pattern |
| [ ] | Left & Right bracket | Match any character inside the brackets |
| [^ ] | Shift-6 with brackets | Match any character not inside the brackets |
| \\d | Forward slash | Match any digit. |
| \\s | Forward slash | Match any whitespace character like space, tab, or newline. |
| ^ | Shift-6 | Match at the start of the string |
| $ | Shift-4 | Match at the end of the string |
# Load the `stringr` library from the tidyverse
library(stringr)

# Create a vector of character types (a.k.a. strings)
porsche <- c("718 Boxster", "718 Boxster S", "718 Cayman", "718 Cayman S", "911", "Taycan", "Panamera", "Macan", "Cayenne")

str_length(porsche)
str_length(porsche[4])

str_c(porsche[2], " ", porsche[4]) # Creates one string

str_sub(porsche,1,4)       # Start and end positions
str_sub(porsche,1,-3)      # End 3 characters from the end
str_sub(porsche,-3,-1)     # Start 3 characters from the end; End at the end

str_view(porsche, "c")
str_view(porsche, "C")     # Case sensitive
porsche |>                 # Make lower case then view
  str_to_lower() |>
  str_view("c")
str_view(porsche, "a")     # Finds only the first match
str_view_all(porsche, "a") # Finds all matches
str_view(porsche, "er")    # Exact match
str_view(porsche, "[er]")  # Any letter inside the brackets
str_view(porsche, "[^er]") # Any letter not inside the brackets
str_view(porsche, "[1-9]") # Any number in this range, only the first match
str_view_all(porsche, "[1-7]") # Any number in this range, all matches
str_view(porsche, "\\d")
str_view(porsche, "\\s")
str_view(porsche, "n+")    # One or more
str_view(porsche, "1+")    # One or more
porsche |>                 # Make lower then view last letter is s
  str_to_lower() |>
  str_view("s$")
Create an object with the encoded message below. Follow the regex steps in Table 3.3 with the str_replace() and str_replace_all() functions to decode the message. Notes are in parentheses. The space character is designated with [space]. The answer is provided in Section 3.7
Z1consZdQr2QvQrythX3worthlQss4bQzQ5of6thQ7xX8valuQ9of1knowX2ChrZst3JQsus4my5qhhhZlZppZans :
| Replace this string | With this string |
|---|---|
| z | caus |
| hh | [space]-P |
| x | surpass |
| q | Lord |
| Any number | [space] |
| : | 3:8 |
| Z | i |
| (the first) i | I |
| X | ing |
| Q | e |
| rd | rd.[space] |
3.6 More Writing Code for People
Resource: Wickham chapters 1 - 4
We added a fifth guideline for writing code for people based on packages and a sixth guideline based on using pipes. All six guidelines are listed below. Review these guidelines as needed and continue to follow the examples in the demonstration code.
Object names: Use descriptive names with the underscore character between words. Object names should be descriptive, but not too long. Length is a matter of preference.
File names: Similar to object names. For homework submission, your file names must include your last name as the first word. For example
smith_cp2.Rwhere cp2 means the coding practice 2 homework.Spacing: Include a single space after each element in a line of code except parentheses. The following line of code demonstrates proper spacing:
homework_done <- format(Sys.time(), "%A %b %d, %Y at %R")Comments: Contrary to Wickham, chapter 3, section 3.4, you should use comments to explain the how, what, and why. Your future self will thank you and me for this practice. Comment liberally! As your coding becomes more complex through this course you should include links to web resources that helped you with your code as well as explain what you were thinking and why you chose to solve the problem the way you did.
Packages: Install packages from the Console window, not in your script files. Load all required packages at the top of your script files and include a comment explaining why the package is needed.
Pipes: Use the
|>operator to sequence functions for readability. Every|>operator should be followed by a new line.
3.7 Decoded Message
Here is the R code for decoding the message at the end of Section 3.5
# Load the `stringr` library if not already loaded
library(stringr)

message <- "Z1consZdQr2QvQrythX3worthlQss4bQzQ5of6thQ7xX8valuQ9of1knowX2ChrZst3JQsus4my5qhhhZlZppZans :"

# I am choosing to store each replacement into a new object
# This allows for easier viewing of results and troubleshooting

message_1 <- str_replace(message, "z", "caus")

message_2 <- str_replace(message_1, "hh", "-P")

message_3 <- str_replace(message_2, "x", "surpass")

message_4 <- str_replace(message_3, "q", "Lord")

message_5 <- str_replace_all(message_4, "[1-9]", " ")

message_6 <- str_replace(message_5, ":", "3:8")

message_7 <- str_replace_all(message_6, "Z", "i")

message_8 <- str_replace(message_7, "i", "I")

message_9 <- str_replace_all(message_8, "X", "ing")

message_10 <- str_replace_all(message_9, "Q", "e")

message_11 <- str_replace(message_10, "rd", "rd. ")

message_11
The context of Philippians 3:8 is Paul first bragging about all he is and all he has accomplished (vv.1-6), then explaining that those things are of no value compared with knowing the Messiah. Paul states his purpose in this teaching as, “…I consider them garbage, that I might gain Christ … I want to know Christ!” (Philippians 3:8,10)